How to Build a Pond Using Aquascape Pond Kit
Need to build a pond feature in your backyard using Aquascape pond kit? Dont know how to get started? We got you covered ! In this brief article we will walk you through the steps that will help you in building a pond ecosystem.
Step 1: Mark Out Your Pond Area
Pick an area for your pond that is close to your patio and/or deck where you will be able to get maximum enjoyment and use out of it. Use a garden hose to map out the pond and then fill that outline in with a can of marking paint. You will use this as a guide for pond installation later.
Step 2: Place Pond Skimmer and BioFalls Filters - Aquascape Pond Kit
Now that you have the pond mapped out it is time to place both the Pond Skimmer and BioFalls. Typically you want the falls in the main viewing area, along the perimeter of the pond. One can place the Skimmer opposite of the waterfall to achieve the best water flow for your pond.
Step 3: Lay Plumbing
Planning out the plumbing will save you time and effort later. Lay the plumbing around the inner edge of the pond and dig a trench to bury the plumbing.
Step 4: Hook Up and Level BioFalls
In this step you will attach the plumbing to the filter using the bulk head. You will need to do this on the inside to ensure a water tight seal. Once this is done, you will set and dig in the BioFalls. One must ensure the unit is on level ground before setting it into place.
Step 5: Excavate the Pond
You will need to dig your pond 18-24 inches deep. Once this is done you will dig and add your Pond Skimmer. Make sure that it is level before placing it in its hole. You will want to ensure that your water level is set to 3/4th of an inch below the skim when placing the skim inside the hole. Remove sharp rocks and debris once excavation is done.
Step 6: Install Underlayment and Liner - Aquascape Pond Kit
Unfold underlayment and lay it out over the pond shape. Conform the underlayment to the pond shape and set in.
Step 7: Hook Up the MicroSkim
Attach pond liner to skimer. Cover all holes and screws with silicone to achieve a waterproof seal. Keep in mind that silicone needs a minimum of an hour to dry before you can add water to the pond. Assemble pump and plumbing to skim in this step as well.
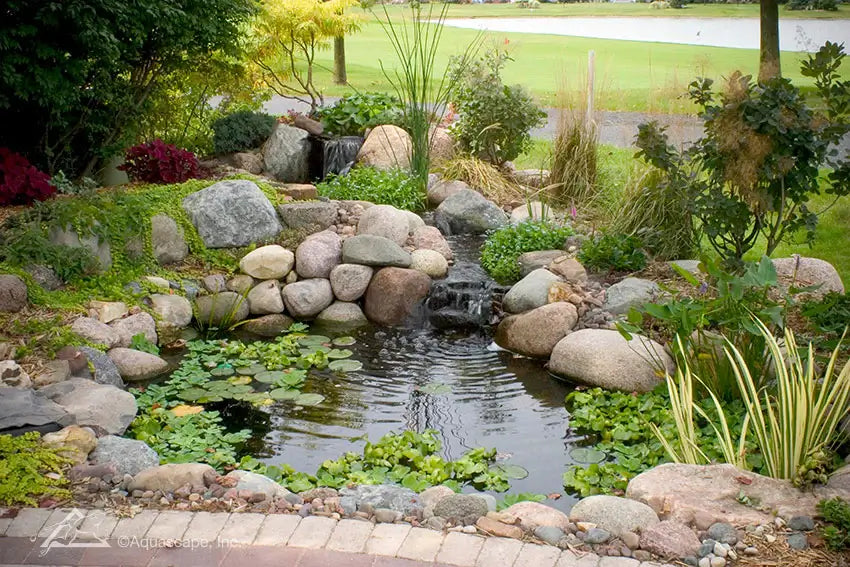
Step 8: Add Rock and Gravel - Aquascape Pond Kit
Adding rocks and gravel to the liner is both functional and great for aesthetics. You will want to use larger rocks to hold the liner in place, so consider this when selecting rock placement. Make sure to cover all of the liner with rocks and gravel.
Step 9: Install Under Water Lights (optional)
Position and hide lights amongst the rocks for a seamless look to your pond. Under water lights can increase the time spent around the pond for you and your family, as well as improve the aesthetic aspect of your pond.
Step 10: Wash Rocks and Gravel - Aquascape Pond Kit
Washing the rocks and gravel will set you up to have beautiful, clear pond water. Removing the dirt and debris improves the clarity of the water drastically. Suction out dirty water using a pump.
Step 11: Fill up Pond
Grab some lemonade, take a break, and fill up your stunning pond. One can use a simple garden hose can for this step.
Step 12: Build the Waterfall - Aquascape Pond Kit
Add filtration materials to the base of the MicroFalls; put pads down first. Use rocks and boulders to make an interesting and creative path for the water to flow.
Step 13: Bring in Topsoil
Next step is to add the top soil. Landscaping the perimeter of your pond with top soil will help achieve a seamless look in your backyard.
Step 14: Build the Retaining Wall
A retaining wall is a great way to slow the process of erosion. Use boulders to the line the edge of the pond to create this retaining wall.
Step 15: Tweak the Waterfall - Aquascape Pond Kit
It's time to turn on the pump and bask in the glory of your new waterfall feature. Observe how it is flowing and add small rocks to change the water flow if need be.
Step 16: Trim the Liner
Trim the liner from the edges of the pond and leave 6 inches of liner for gravel and back fill it with dirt.
Step 17: Mulch the Berm - Aquascape Pond Kit
To improve the aesthetics of your pond add mulch to the berm to begin facilitating landscaping options.
Step 18: Clean Up
Clean up and enjoy your new oasis! Take some photos and feel free to share them to our Facebook page- we love to see what you create!
Conclusion
At LandscapeSupplyGuys.com, we sell a wide variety range of pond kits, waterfall kits, pondless waterfall kits, decorative water features, pond pumps, and pond aerators required to build a waterfall or pond.
**Aquascape pond kit does not come with rocks, boulders, gravel, or soil